That’s right, I’m putting the Craft back in Craft-Bang-Boom. Aw yeah.

Anyway, in addition to the Kodachrome Curtain of Controversy, I’ve also made a few lamps using slides. They’re really simple to make, so I thought I’d do a quick tutorial on how to make them.
Note – I make absolutely no claims whatsoever on how long the images on the slides will last without fading. I have no idea. It depends on a lot of things – how old the film is, what type of film was used, storage conditions of the slides, whether or not it’s sitting in direct sunlight, things like that. The Kodachrome curtain has been on my door for about a month 2 months now, getting about 4 or 5 hours of direct sunlight a day. The slides probably date from the 50s to early 60s. So far, there hasn’t been any visible fading. Same thing with the Kodachrome lamp I made last month – it’s sitting in a dark bathroom most of the time and is not exposed to direct sunlight, but is exposed to humidity. So, in short, I have no idea how long these will last. If I notice any fading happening, I’ll update this page.
Anyway, to make a simple little lamp out of slides, here’s what you need:
28 2×2 slides
1 Ball Jar
1 strand of tiny LED lights
1 sheet of white paper (I just used what we normally run through our printer)
Scotch tape
Super glue
1/4″ Square Dowel Rods (I didn’t even know these existed, but we found them at Lowe’s, by the regular round dowel rods) You’ll need 4 lengths of 6 1/4″ and 8 lengths of 3 7/16″
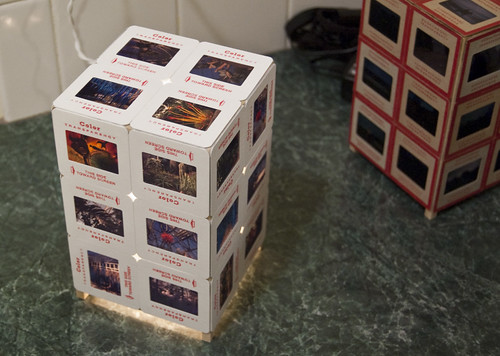
1. Select your slides and arrange them into 4 groups of 6 slides, and 1 group of 4 slides. The group of 4 slides will be the top of the lamp, the others will be the sides.
2. Cut your printer paper into pieces big enough to cover the image area on the slide. The image area of the slides can vary based on what type of mount is used, but for a 35mm slide, rectangles the size of 1 3/4″ x 1 1/4″ should be good. For 127 sized slides, a 1 3/4″ square should suffice.
3. Using tiny bits of Scotch tape, tape the paper to whatever is going to be the back of the slides.

Don’t think you can skip this step, either – it’s a bit fiddly, but you need the paper there to diffuse the light from your light source.
4. Again using the Scotch tape, tape your panels of slides together (4 panels of 6 slides, and 1 panel of 4 slides) by putting the tape on the back side of the slides. Be careful not to tape together slides upside down. That will look silly. Trust me, I know.

If you’re really lazy, you could have taped together your slides into panels first, and then taped a bigger piece of paper over the backs of all of them at once. I haven’t tried that, but I don’t see why it wouldn’t work.
5. Check and make sure your dowel rods are cut accurately, and then glue the dowel rod pieces to the slide panels as shown.

You want the 1/4″ of the long dowel rods to be sticking out at the bottom. These will be the legs of the lamp, and will allow enough clearance so that the cord of the LEDs can fit under it.
6. Glue the side panels together.
7. Stand the lamp up, and glue the top panel on top.
8. Stick the strand of LED lights into the Ball Jar. If you want, you can tape the cord to the side of the jar using clear packaging tape, but I didn’t find that necessary.

9. Plug it in, and stick the shell on top. Ta dah!

It’s a lamp!
As you can tell, I mixed pictures of both of the Slide lamps I made in the tutorial. The first lamp used, instead of a string of LED lights in a Ball Jar as a light source, one of Travis’ glass insulator LED lamps, since that’s what we had around the house. That lamp was slightly blue tinted, and the LEDs were a cold white, which really affected the way the light came through the lamp. The second slide lamp was made using the strand of warm white LEDs. Not only was the light warm instead of cold, there were 10 times as many bulbs, so the second one is much brighter.
Obviously, there’s no limit on what type of slide/light source combination you can use. I really like the LEDs, because they emit no heat and can be plugged in and forgotten about – they use barely any electricity at all. I would be more concerned about using incandescent or florescent lights, as they tend to be quite a bit hotter (although florescent might be okay if you had a larger amount of space between the slides and the light source). I really wouldn’t recommend using anything besides the LEDs – if you decide to, that’s on you. I’ll be here in the corner screaming, “No! NOOOOO! NOT THE HALOGEN BULB MY GOD DO YOU WANT TO KILL US ALL!!!”
Also, obviously, you could make this as large as you wanted to – this combination of slides and the medium sized Ball Jar works out well for a beginner project, especially since you can still buy a roll of 36 exposure slide film and get that processed if you don’t have any other slides hanging around that you’d like to use.
eta 4-23-10 – Oh, hey, I just realized this tutorial was featured on Etsy’s How-To Tuesday. Neat! Thanks, Etsy! In related news, and actually entirely coincidentally (really, I swear!) I’ve just opened a brand shiny new Etsy shop full of vintage cameras and photography related goodies. I’m planning on selling little bundles of slides in it for slide related crafts. Hopefully I’ll be able to start getting some of those up within the nest few days.

Lovely idea!
I am a former Art, Art History, History teacher and have (at the very least), a gazillion 35mm slides (and they are all so pretty and jewel-like when you hold them up to the light) of everything from Julius Caesar to Miro and, if I start right now, I can have more than enough amazingly different Christmas presents made for absolutely everyone that I have ever known in my entire life, ready by, oh maybe, mid July!
Thanks!
Shell
P.S. My husband will also be thrilled to the teeth, since he has been “encouraging” me to get rid of them for years,… no, make that decades.
LikeLike
blown away! More!
LikeLike
So after finding your flickr page I decided I’m making one of these, my only question is, where did you get your lights?
LikeLike
Hey, Justin! I’ve gotten mini-strands of LED lights at places like Target and Jo-Ann Fabrics. If you’re really adventurous, you can try making your own LED lights like my husband did, as seen here: http://yarnzombie.net/Travis/?p=303 Good luck!
LikeLike
I only have 24 slides, is there any part of the lamp that can be omitted? can i replace the 4 slides with something else? tissue paper maybe?
LikeLike
Hey very cool – – thanks for sharing instructions. i came across this awhile ago and it’s been on my mind ever since – – i have some extra slides laying about – they were my Dad’s but only landscape shots — Lake Tahoe, the Calif desert, no family so i did not have a real attachment to them. I just finished my lamp — made as a gift for my brother. Looks pretty good – your instructions are very good. My lights (string of 30 small led) are a little dim – – i think i need a slightly taller bell jar.
LikeLike